
Install the app
How to install the app on iOS
Follow along with the video below to see how to install our site as a web app on your home screen.
Note: This feature may not be available in some browsers.
You are using an out of date browser. It may not display this or other websites correctly.
You should upgrade or use an alternative browser.
You should upgrade or use an alternative browser.
Missing Network Settings (DHCP...)
- Thread starter GeraldFi
- Start date
Don't have 11 to check, but according to the Parallels 11 User Guide p.153 it should be on the Network tab of Parallels preferences (rather than the Advanced tab in P10). Note that features like port forwarding are now P11 Pro only ....
http://download.parallels.com/desktop/v11/docs/en_US/Parallels Desktop User's Guide.pdf
http://download.parallels.com/desktop/v11/docs/en_US/Parallels Desktop User's Guide.pdf

marat_t
Pro
These options are now available only in Pro and Business editions: http://kb.parallels.com/en/123296
These options are now available only in Pro and Business editions: http://kb.parallels.com/en/123296
Heh. It just never ends, does it.
Maria, is there anywhere that you guys have posted a definitive list of what has been removed from Standard and moved into Pro? Is this not information users should have? Is there a reason not to enumerate the changes?
I really think Parallels should be straightforward and list exactly what has been moved out of Standard and into Pro, since this seems to be the repeated response from you guys and we learn something new that was removed every day.
I use the advanced network settings to test certain client/server applications without buying networking hardware. However, I upgraded to El Capitan but did not know about this ridiculous limitation until now. Now, my server vm is useless. To make things worse, they tell us we now need to subscribe and pay extra over time just to use this feature. Sorry, just lost another customer. Switching to vmware...
After trying out VMWare, I came back to Parallels as it had native USB boot capability amongst other things. Fortunately along the way, I found 2 ways to edit the network settings in Parallels Desktop 11.
Option 1: Temporarily Use Parallels 10--Easiest
If you still have a Parallels 10 key and media, you can install over the existing Parallels 11. This will remove 11 but keep your VMs intact. From here, you can use the network editor of Parallels 10 to change the network. Once you make the network changes, re-install Parallels 11. The current network should remain set.
Option 2: Directly Modify Parallels' Network File
When Parallels initializes, I found out that it uses the network settings from: /Library/Preferences/Parallels/network.desktop.xml. If you did an in-place upgrade, the existing network should remain as it was. However, if, like me, you upgraded to El Capitan and did a clean install of everything, you'll either need to do Option 1 or modify the said file using the following procedure:
My Test Network
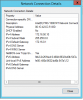
My virtual network is on a 172.16.0.0/16 subnet. It has server 2012 and windows VMs for testing purposes. The server is running DHCP and DNS amongst other roles and hands out addresses successfully after doing the above changes.
GUI From Parallels 10
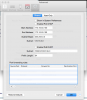
Text File Equivalent (Shared Network Section)
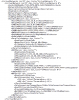
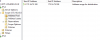
Server/Client Settings
Option 1: Temporarily Use Parallels 10--Easiest
If you still have a Parallels 10 key and media, you can install over the existing Parallels 11. This will remove 11 but keep your VMs intact. From here, you can use the network editor of Parallels 10 to change the network. Once you make the network changes, re-install Parallels 11. The current network should remain set.
Option 2: Directly Modify Parallels' Network File
When Parallels initializes, I found out that it uses the network settings from: /Library/Preferences/Parallels/network.desktop.xml. If you did an in-place upgrade, the existing network should remain as it was. However, if, like me, you upgraded to El Capitan and did a clean install of everything, you'll either need to do Option 1 or modify the said file using the following procedure:
- Shutdown all VMs
- Quit Parallels
- Open Terminal
- Type this command and press enter: sudo nano /Library/Preferences/Parallels/network.desktop.xml
- Enter your password
- Edit the appropriate settings (use the arrow keys to navigate)
- Press Control+X (To Exit)
- Press Y (To Save)
- Press Enter (To Confirm)
- Power On your VMs
My Test Network
My virtual network is on a 172.16.0.0/16 subnet. It has server 2012 and windows VMs for testing purposes. The server is running DHCP and DNS amongst other roles and hands out addresses successfully after doing the above changes.
GUI From Parallels 10
Text File Equivalent (Shared Network Section)
Server/Client Settings
Attachments
Hi WitoldO, Can't agree more!Thank you KevinO1.
Shame on Parallels for taking money for upgrade and then removing functionality.
Thank you KevinO1.
My /Library/Preferences/Parallels/network.desktop.xml contained setting from an older installation but this seems not to work even if I see an open port 10001 after starting the vm (netstat -an | grep 10001).
Code:
          <NATServer dyn_lists="">
              <Enabled>1</Enabled>
              <PortForwarding dyn_lists="">
                  <TCP dyn_lists="ForwardEntry 2">
                    <ForwardEntry id="1" dyn_lists="">
                        <RuleName>fw rule 0</RuleName>
                        <IncomingPort>10001</IncomingPort>
                        <RedirectIp></RedirectIp>
                        <RedirectPort>10001</RedirectPort>
                        <RedirectVm>{343a5954-f02d-4325-b657-d25a4493a107}</RedirectVm>
                    </ForwardEntry>
                  </TCP>
                  <UDP dyn_lists="ForwardEntry 0"/>
              </PortForwarding>
              <IdleConnectionTimeoutSecs>7440</IdleConnectionTimeoutSecs>
              <UseIPFilter>0</UseIPFilter>
            </NATServer>